I’ve had a bit of a hit and miss relationship with motorcycling jeans in the past. More of a miss than a hit, to be perfectly honest. My biggest problem was the fit, especially around the waist area. They were usually too big and stood away from my waist too much and after a couple of hours of riding they became really uncomfortable around the hips. The trouser legs were quite wide and straight cut which meant they were flapping around my ankles when I wore ankle boots but were too wide to tuck into my sports boots. I had therefore decided that motorcycling leggings were the way forward for their fit and comfort.
I’ve always liked the look of the jeans on a motorcycle so I wasn’t ready to give up on them just yet. I’m really glad I haven’t because the RST x Kevlar Ladies Tapered Fit Jeans are a bit of a game changer.
Not only did the material and the stitching look and feel of high quality as soon as I picked them up, they are CE AA rated with the CE Level 1 knee armour. But what impressed me more was the fit. The waist is high enough to stay in place as you sit on your motorcycle and not pulled down or sticking away from your back as it often happens on badly fitting trousers. They are shaped just enough to follow the shape of my legs and the trouser legs are tapered at the bottom to fit comfortably inside my boots. The Kevlar lining ends mid-calf so there isn’t an extra layer of fabric that you need to squeeze into the boots. After a few decent ride outs I am happy to note the jeans kept their shape and don’t stretch too much to end up looking baggy.
Not only that, but the little details such as the measure lines inside the jeans to help you adjust the knee protectors is quite frankly, genius. This means that when you take the knee protectors out to wash your jeans, you don’t have to spend ages re-adjusting them again. All you have to do is remember the position they were in before and pop them back in. The knee protectors are housed inside a fabric bag with a velcro strip which adds to the flexibility of where to position them for the perfect fit and best protection. There are pockets for hip protectors, too should you wish to add them.
The jeans are made from stretch material which means you should go for the smaller size if you are in between sizes. The stretch in the material adds to the comfort and after a day of riding (150 miles) I returned home to a genuine surprise that I was wearing a pair of jeans and not my usual leggings. That’s just how comfortable they are and I am really looking forward to those summer rides of keeping cool in these jeans.
For more reviews check out our dedicated Reviews page
For more RST Apparel News check out our dedicated page RST News
The sheer thrill and joy of watching a MotoGP race raises the adrenaline level which further elevates a man’s desire to become a MotoGP rider. Everyone will agree that one’s chances of becoming an actual MotoGP rider are rather slim, however, you can get the closest virtual experience by playing the latest MotoGP 2021 game on your favorite gaming console. The game provides the best immersive experience you can get in the comfort of your home and everything has been created to mimic the real-life MotoGP experience, even the pit stops are a 100% replica of real-life MotoGP.
The resemblance does not end at pit stops or the maps, even the motorcycle’s riding dynamics can be customized according to your taste or as per the lap’s requirements. The suspension system, fuel consumption, tyre wear, and surprisingly even the brake temperature is also adjustable. Such a huge number of customizations make a huge difference at the end of the day as each of them makes a little contribution to the winning formula. The modifications are just not limited to the bike, in fact, you can customize the rider’s gear including the helmet using the 5 in-built graphic editors available.
The gameplay also has some iconic new features in 2021, creating an electrifying, strategic and adrenaline-fuelled racing simulation. These include:
• Bike Retrieval Sequence: Once you fall, you’ll no longer automatically respawn on track. You’ll have to get up and get back on your bike, as fast as you can. Pay attention to how you take the corners!
• Brake Temperature: Riding is not only a matter of speed, but also of strategy. Monitoring the temperature of your brakes is the key to always having the situation under control. If they are too hot or too cold they risk losing their effectiveness.
• Long Lap Penalty: Finally, the feature is coming to the MotoGP™ videogame franchise, meaning that penalties can now be more specific.
• Bike Suspension System Revisions: The level of realism is increasing again. This feature is dedicated to all the bike simulation lovers!
The level of intensity can be toned down a bit by switching to Moto 2 or Moto 3, though, they have the same level of attention to detail as the MotoGP. All the rules that are exercised in real-life Moto races are also applied in the virtual world without any changes. Another little detail that might not sound as significant is that every two-wheeler needs to be retrieved by its rider in case of an accident which also adds a touch of originality to the gameplay.
All of the above-mentioned features will be futile without a smooth and interactive experience. Therefore, the game supports a resolution of up to 4K with 60fps that makes it one of the most immersive games in the market. A high bandwidth connection with low latency makes the loading process faster and enables more players to challenge you on the track. The advanced A.I integrated into the game acts like another player in case of an offline race and thus provides the most natural experience you can ever get.
Whilst a huge fan of bike racing when it comes to gaming yes, personally I’ve always been fps fan with the like of Halo, COD and Gears of War etc I could never get on with racing games of any type be bikes or cars.
For me personally it gets a bit boring when you keep crashing or running wide and finishing last (this is with any racing game I play). That said with added next gen graphics etc this is a must for any bike racing fan who is also a good gamer.
MotoGP™21 was released on April 22nd, 2021 on PlayStation 5, Xbox One, Xbox Series X|S, Nintendo Switch, PC, Steam and Epic Games Store.
If you would like to receive our headlines daily to your email inbox then sign up to our newsletter: Here
With the spring teasing us with the first of the warmer days the dreams of summer motorcycling are very much awake. With the change in seasons, the motorcycle clothing gets a once over, too in anticipation of swapping the winter textiles for lighter summer gear.
It is nearly time to retire my winter quilt-like gloves that have served me so well and look for something lighter to stop my hands from sweating in the heat of the summer.
Enter the RST Urban Air 3 glove.
Due to a mix up in the delivery, I originally received the men’s glove size medium. The fit wasn’t great, too big overall and especially the ring and the little finger were lost inside the glove. When I received the ladies’ medium size the difference was noticeable. These fit ‘like a glove’! A great tight fit that isn’t too difficult to get on and off your hands.
In previous seasons I have always opted for a full leather short summer glove and was curious how the leather/textile mix will feel and perform. One thing I can tell you straight away – the air circulation in the RST glove is incredible. You can feel the air going in through the fingers and cooling your hands. Perhaps a little too much in April and thankfully the heated grips did their job whilst I was testing them, but I can see how this will make a huge difference in the summer months.
The mesh sections are fitted on the upper side of the fingers allowing for ventilation and preventing your hands from sweating too much. This means the glove stays dry in hot weather and should be easy to put back on after a pit stop for coffee and cake.
Because they fit so well you feel every control as if you weren’t wearing gloves which makes for a much more enjoyable ride especially after taking the winter ‘quilted’ gloves off. The control of the clutch increases, the throttle responds better and the breaking becomes smoother.
These gloves don’t only look smart and help you ride smoother, they are also Level 1 KP CE certified so they will keep you safe in case of a slide. The protection comes from TPU on the knuckles and TPR on the fingers as well as a memory foam thumb. The palm of the glove is full-grain double layer leather. The index finger also has a smart touch leather for handling your phone/sat nav (never whilst riding!). There is also a large hook on the inside of the glove to help you pull it on the hand if they feel tight or your hands have swollen. The gloves fasted with a hook and loop velcro strap at the wrist.
The glove comes in a few colour variants – full black, black/blue, black/red, black/fluo yellow and my chosen colour combination in black/white to match my Supersport.
I may be a latecomer to the RST brand, having been fairly unfamiliar with it until recently but I see it slowly becoming a regular in my motorcycling wardrobe. The quality, the design and the attention to detail is evident and very impressive.
For more reviews check out our dedicated Reviews page
For more RST Apparel News check out our dedicated page RST News
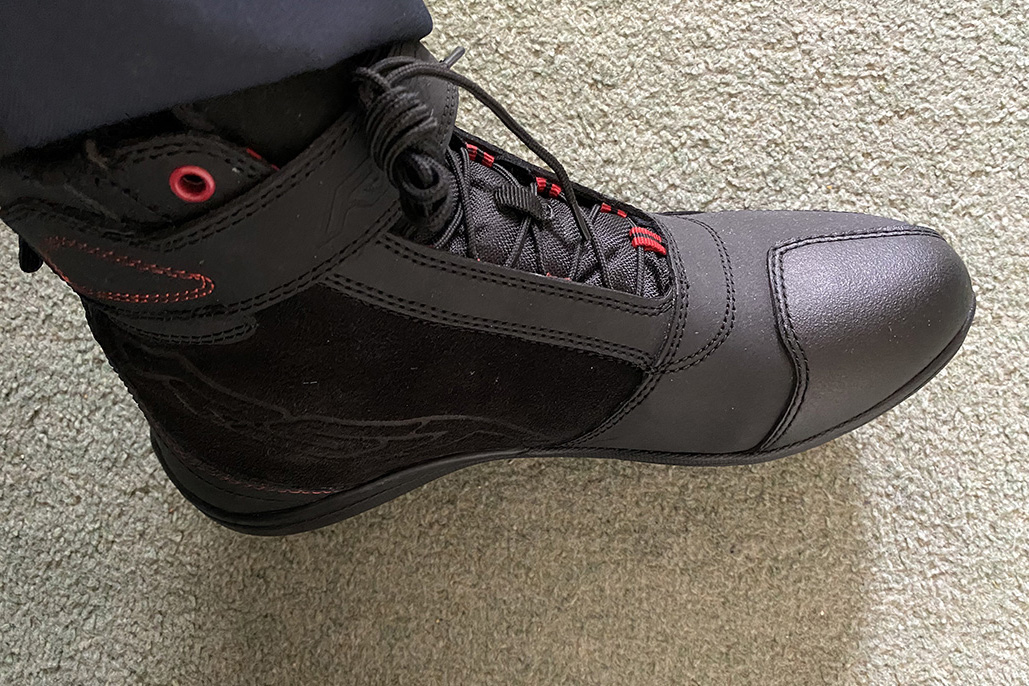
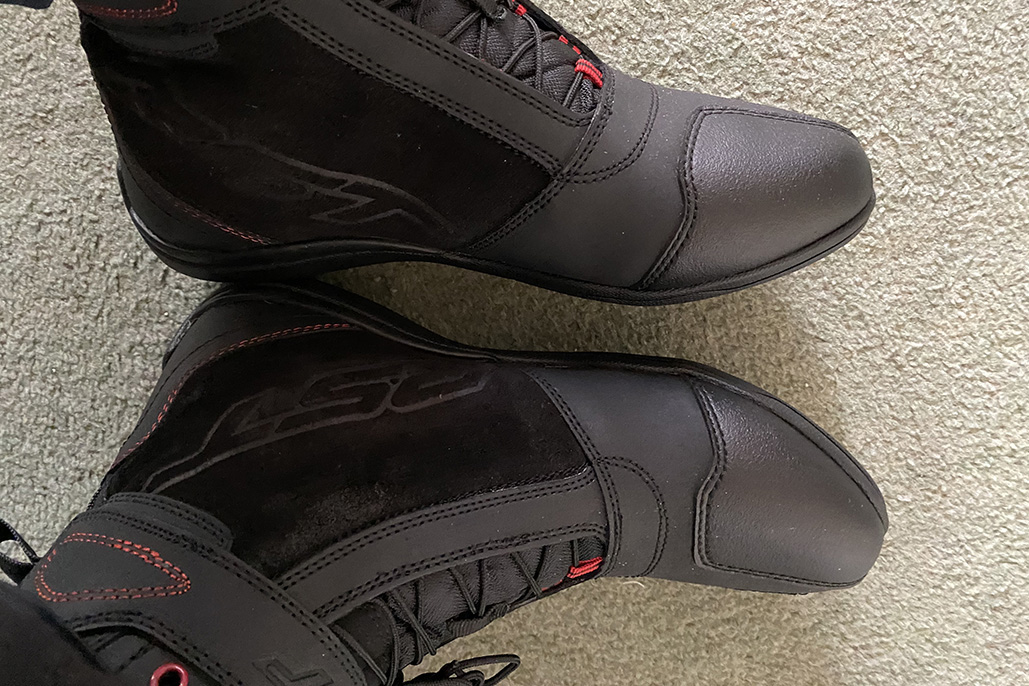
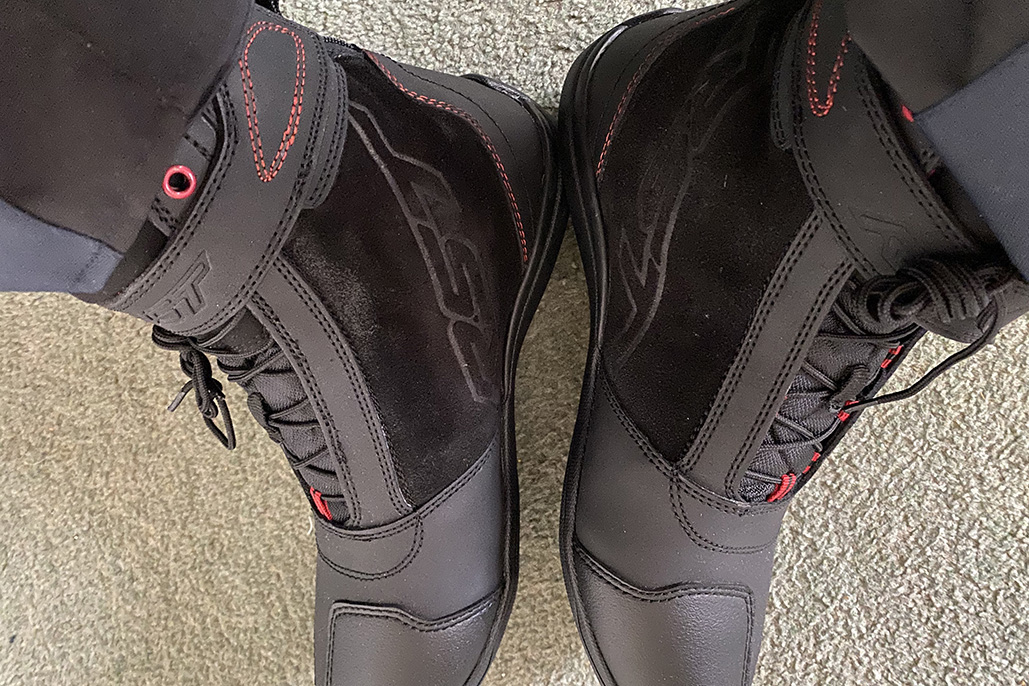
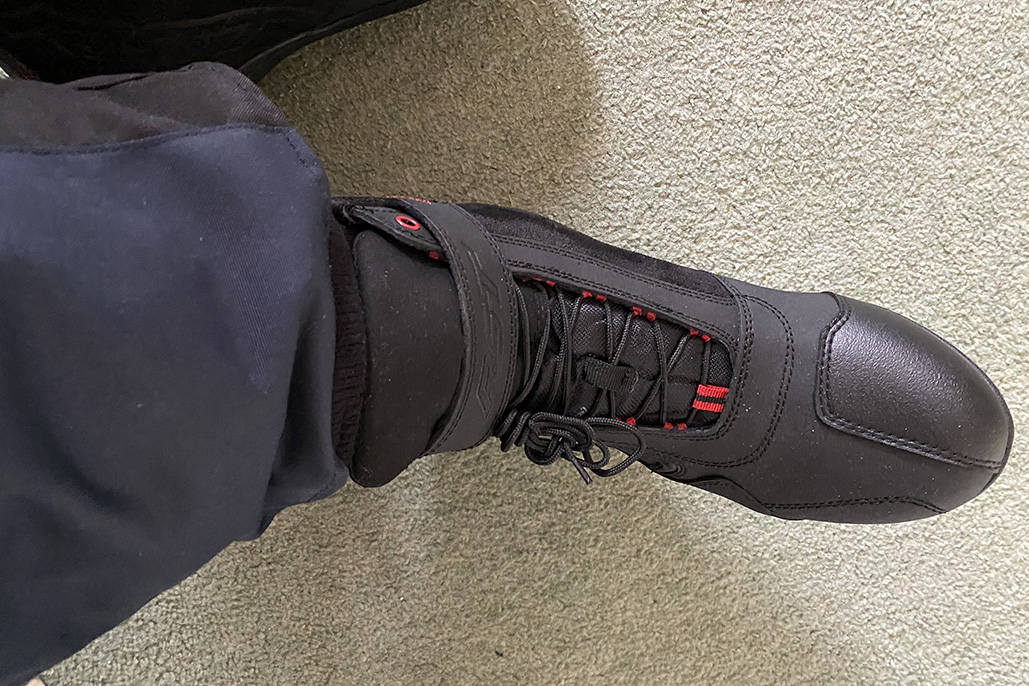
Boots form an essential part of any motorcyclist’s protective gear and over time their styling and comfort have become at par with any modern trainer (sneakers). RST’s Frontier boots are a contemporary version of traditional bike boots.
The RST Frontier boot, as the name suggests, are a cross between regular motorcycle boots and your everyday trainer. The base features a flat sole and the overall height is in comparison to a high top trainer, which of course, protects your ankles in case of an impact. Every essential piece of armor has been attached to the boots despite its apparent trainers-inspired styling & build quality. A special focus has been laid on the toe, heel & ankle protection and at the same time, no compromise has been made been on the comfort aspect. The all-around mesh lining combined with an anti-bacterial gel sole delivers supreme comfort and makes the boot comfortable enough for a light walk. The inclusion of rubber shift pads makes the task of changing gears much easier and slick so that you don’t miss out on any adventure that your bike has to offer.
The above features are rather common and can be found in several competitors, however, it is the small details that prove the high level of attention to detail that went into the production and manufacturing of these shoes. These details set the RST Frontier apart from its counterparts and further justify its already affordable price tag. The heavy-duty microfiber exterior glued to a ballistic interior absorbs minimal heat both from the surroundings and the engine, thereby, making the shoe an excellent choice for summers.
The red stitching has been done using an abrasion-resistant thread that adds to the sporty character and at the same time holds the joints together in case of a slide along the tarmac. Another little handy feature integrated is the lace garage that allows you to nicely “park” your laces inside it so that they don’t get tangled. The reflective markings and the logos provide secondary protection and make the boot visible from afar in poor conditions.
The Frontier boots are a great addition to the RST’s boot lineup, and they provide a whole bunch of features at a relatively affordable price tag and are flexible enough to walk around in all day.
The availability of two different color schemes and several size variations is sure to cater to the needs of every age group and the use of high-quality materials will further ensure the longevity of the RST Frontier boot.
These will be my goto boots for short rides where I know I the weather will be good and where maybe be doing a fair bit of walking as well.
For more reviews check out our dedicated Reviews page
For more RST Apparel News check out our dedicated page RST News
Cameras are everywhere you look these days. Speed Cameras, CCTV cameras, Dash Cams and also Action Cams. If you are looking to capture your epic events then is an action camera the tool for the job? Superbike News recently reviewed a motorcycle dash cam https://superbike-news.co.uk/viofo-mt1-dash-cam-review/ so, which is right for you, an Action Cam or a Dash Cam.
The Ghost X from Drift is a compact action camera that has been designed to be mounted virtually anywhere. It records HD 1080P video at 30fps
It’s Drift’s budget camera coming it at about £130, it offers a 5 hour battery life which can be extended to 8 hours with the bigger battery unit that is available for another £25. The included 32GB microSD card might need to be replaced for a bigger one as a 10 minute video (1080P) takes up 3.8GB of storage so by my very rough calculations you are probably good for 1.5 hours before you’d fill the card. Not a problem if you change one of the mirad of settings to give you loop recording. The loop interval can be set at different stages between 10 seconds and 10 minutes meaning it will record at 10 minute lengths until the card is full then return to the start and begin overwriting.
In the box is everything you need to get started. I initially ignored the instruction manual as it looked too thick and technical. I set about figuring the camera out myself. There are only 3 buttons on the top how hard could it be. One button is clearly an on/off as identified by the international on/off symbol. I pressed it, nothing. I pressed and held it for a couple of seconds and the little camera beeped into life.
The back of the Ghost X has the tiniest of screens, smaller than a postage stamp, it had illuminated a pleasant green colour. This is where those with bad eyesight may begin to struggle. The little screen is giving out a lot of information in such a small space but, if you can see it, it does makes sense.
Information such a recording mode; view angle; recording quality; the number of files saved; battery life and remaining card capacity are all shown on a screen size of 132mm²
Staring at the screen I began pressing buttons, The top button, the one closest to you as you look at the screen, cycles the display through the various modes that the Ghost X has to offer, Video, Still camera, time lapse, burst image, settings menu, each one of these comes with its own colour. This will prove useful as you can instantly tell the mode the camera is in simply by looking at the glow and not squinting at the screen. Pressing the button again cycles back to the start. I pressed the middle button and discovered this cycles through the options on the screen being displayed, so in video mode you can alter the resolution to 1080, 960, 720 or WVGA which is probably the same resolution as a typical CCTV camera the advantage being you can up the frame rate to 60fps if you need to. I’m not a keen photographer so would probably need to look up what a lot of the settings do to fully understand the functionality of the Ghost X but then I would probably ignore them all and set it to record video at its best 1080P x 30fps resolution and never touch any settings again.
Cycling through the screens and the modes, I only had to revert to the instruction book once and that was to understand what the K140 meant. I could change it to K90 and K115 but did not know what I was doing. Reluctantly, I flicked through the quick guide to realise that the K wasn’t a K but a symbol to illustrate the field of vision for the recordings. There are three options 90º, 115º and 140º.
Once familiar with the button layout and how the options on the screens cycle through the menu options and back to the beginning, setting up the time and date and other options on the Ghost X was relatively simple. Just click slowly to get to where to need to be otherwise run the risk of cycling through all 28 menu options before getting back to where you need to be. (press and hold the button to go backwards through the menus)
One of the 28 menus was Video tagging, this seems like a very clever idea if you don’t want to be recording all day and then have to wade back through hours of footage to find that one time where your mate did something cool. Video tagging is like having the Ghost X set in sleep mode, it’s always watching but not recording until you press the record button. Then, depending on the settings it can record the previous 2 minutes and the following 2 minutes. With Video Tagging, you’ll never miss that perfect action shot ever again.
I eventually found my way back to the screen that told me the camera was in video mode but how to actually record video? I had one button left to press so pressed it, The Ghost X emitted a little beep, change to a big beep or no beep in settings, and the green glow turned red. It was recording.
Starting and stopping is as simple as touching a button and to check it was all fine I hooked the camera up to the computer using the included USB lead and was impressed at how quickly the device was recognised. Much easier than removing the SD card from a DashCam type recorder. The Camera also charges up while attached to the computer and the little screen glows green when fully charged.
Feeling good that I had worked out all the buttons and squinting at the tiny screen, I was feeling ready. I just one had more flick through the user guide to make sure I had found everything. It was at this point I made the life decision to read the manual first on every new thing I get.
The guide was easy to use and only so thick because it contained all of the languages. It mentioned an APP, of course there is an APP, I downloaded that and looked up how to connect the APP to the camera. It was here that the instruction booklet came into its own. After connecting the APP to the phone via on-board Wi-Fi (easy) you get full access to all the system settings on your phone screen, not one that is 11mm wide x 12mm high. You can see a live image of the camera on the phone to help you set in the perfect location. You live and learn. The APP does a lot more than just system settings you can control the camera, live stream and join the drift community to share videos and experiences.
After fiddling with the menus, it was time to fix the camera to my crash helmet. I already have a motorcycle dash cam on the bike, I didn’t want to go full Tellytubby and mount it on the top on my lid so opted for the side. The box contains 2 x 3M sticky pads, one is flat and the other curved. There was a lot of searching for the best location on the helmet to stick it. 3M pads are wondrously sticky so I wanted to find the right place first time. One of the great things about the Ghost X is that the lens can rotate so the camera can be mounted at any angle and the level corrected by simply rotating the lens so that the marker arrow is pointing straight up. Doing this exercise while looking at the image on your phone means you can get it right first time.
As expected from an action camera there are many different mounting option available, the handlebar mount, designed for mountain bikes, might work on the handle bars or crash bars of some motorbikes. It is made from metal and looks & feels well build and robust. There is a pivot mount that will allow for the camera being mounted any which way; a roll bar mount for clamping onto scaffold sized tube. In fact, wherever you want to mount your camera there is probably a mount designed to do that job on the Driftinnovation.com website.
I wanted a sleek fitting camera so went for the simplest solution of the curved sticky pad and then having the camera clip fitting directly into that. The camera clip is indexed onto the camera with a serrated grooved ring that controls the vertical angle the camera. The horizontal view depends on where you put the sticky pad. Changing the orientation of the camera and rotating the lens can be done without tools making camera position changes quick and easy, something that can’t be done with a dashcam.
The camera clip locks into the sticky pad via a couple of spring loaded plastic prongs. Pinching these together enables the camera to slide out. When not on the helmet the sticky pad socket is hardly noticeable. One thing I would always want to be sure of, though, is that the camera clip is securely located in its socket. Make sure you listen for 2 audible clicks as it locks into place and then try to pull it back out. The last thing you want to see is footage of your camera bouncing down the road, if you ever find it again that is. There are no tethers available on the website to offer peace of mind.
The buttons and the release prongs are easy to use with a gloved hand. Once you have mastered where the buttons are, you can turn the Ghost X on and off and start and stop the recording by touch. Or do as I did and start the camera recording and then lock it into place on the helmet. Remember that colour coded screen? There’s a small indicator light above the lens so you can check in a mirror what mode you’re in and if you are recording or not just by looking at it.
Out and about on the bike, I didn’t notice the camera at all. It’s slim enough that it doesn’t rub on your shoulder when cornering and light enough that I couldn’t feel it. I made a few runs, the first one used the onboard mic and suffered horrific wind noise, maybe the sensitivity was too high. The second run I used the external mic. On returning back to base and reviewing the footage I was very disappointed that the mic had not picked up commentary. I did some checks with another mic and diagnosed a bad connector on the original mic. I’ve ordered a new one for £10 which fixed the issue.
With the mic fixed and installed inside my helmet alongside my intercom mic, I connected the app to the camera via the on-board Wi-Fi and set off on another test run using the app to alter the settings along the way.
The Ghost X is not waterproof at least, I don’t think it is. It’s probably not fully waterproof. you see, I’m not really sure if it is or not but there is a waterproof case that is available as an accessory so, if you do want to go out in the rain then that is probably what you need. I tried in on the camera and was not happy with it. It’s good for 40m underwater though! The Ghost XL is waterproof, according to the website, and as it’s only another £20 I’d get that one. However there is one annoyance that comes from browsing the Driftinnovation.com website, and that’s the constant notifications that people are buying stuff. I really don’t need to know that Karen from Margate has just bought a Drift Class 10 MicroSD card 1 hour ago. I want to know the IPX rating of the Ghost X is please so I can decide to go out in the rain or not. Thank you very much.
Overall, a great action camera, reasonably simple to set up and get going but will need some fine tuning of the settings to get the most out of it. I was happy that it came with a fully charged battery so I could start to mess with it immediately. I later searched the website and found out that the Ghost X is IPX4 rated. This means that you can use it in the rain, but not at high speed in heavy rain.
It has other modes apart from the video; you can take 12MP still images; bursts of up to 15, 4MP images and set up time lapse. These are good to have but I wonder how many times they will be used.
It’s certainly less hassle as a camera than a dash cam system, it’s compact and easy to access the files with the USB link, the quality of the video is great and it offers more to the video creator because when mounted on the helmet it follows the rider’s eye. With the bigger battery and a larger SD card up to 128GB the recording times are comparable to that of a hardwired dash cam system, but ask yourself how often do you ride for longer than 8 hours? Even if you do, grab a spare battery that can be charged up via USB and swap them in seconds. The downside is that it only records in one direction and if something happens behind you you’ll miss it.
So which is right for me dash cam or action cam? Well the perfect solution is to have both. The helmet mounted action cam will be used extensively to record live commentary over the top of video for training and feedback purposes and the front and rear dash cam system will be there to record any incidents and as also as back up when, not if, I forget to press the record button.
Definitely a great little camera that looks sleek has a lot of functionality and will absolutely capture your best moments. You should get one.
[wpdiscuz-feedback id=”h0nyqgw8ak” question=”Tell us what you think?” opened=”1″][/wpdiscuz-feedback]
Women’s motorcycling gear has come a long way in the last few years and it is great to see that more brands are paying attention to what women want.
Protection on our motorcycles is high on our priority list and a proper fit ensures good protection. We also want to look good in our motorcycling gear and not wear men’s fitting clothing with added swirls and bits of pink and call it women’s gear.
Comfort is also high on the list, I suspect for both, male and female riders. Having the gear that is uncomfortable can spoil the ride.
With the change in the seasons and warmer weather arriving a pair of motorcycle leggings is the go-to choice of clothing after ditching the bigger and bulkier winter textiles. I love them because they are so comfortable and simple. No faffage with thermal or waterproof layers, just a pair of trousers that fit like a second skin then you forget about them. Perfect for summer riding.
Weise Pulse leggings are great. They offer protection as well as a good fit. The leggings have two layers, the inner one is aramid fibre lining and the top one is stretch cotton and polyester mix. They are CE approved and AA rated which is the second-highest level of protection and the leggings are fitted with knee and hip armour.
The inner layer ends just at the top of the calf which means there is only one layer in your boots and therefore negating any potential uncomfortable bulking of the material inside your boots.
The waist is cut high with a thick band that keeps them in place and there is no rolling of the top. I would have liked it slightly higher on the back, especially for the sportier ride where you lean forward. Belt hoops would have been useful too, as I found they did slide down a little bit.
I am usually size medium or in between 10 and 12 in most trousers and I ordered the leggings in size 12 (medium). They were too big all over, the waist was standing away from me and there was too much material around my bum and thigh area. The size 10 (small) ones are a much better fit with no sagging of the outer layer and the armour stays in place. Also, the waistband now sits snugly against me.
The two waist pockets at the front are deep enough to safely tuck in small items without fear of losing them.
Time will tell how well they keep their colour after a few washes as black is usually difficult to keep dark when you are riding in the sun and washing the leggings regularly.
All in all a great pair of motorcycle trousers to keep you safe, looking good and incredibly comfortable.
[wpdiscuz-feedback id=”9ftceg2w76″ question=”Tell us what you think?” opened=”1″][/wpdiscuz-feedback]
Getting your bike permanently rigged up for on-board video recording may not sound like the sort of thing you want to do but having a record of that car pulling out on you while you were perfectly in the right may go a long way to help with any insurance claim, but why else would you want one?
Action cameras have come a long way in recent years; Go-Pro, Drift, Insta360 and the like are great, but there is an element of faff that inherently comes with them. If you are like me, you don’t want to get to the end of a gorgeous ride and realise that you forgot to record it. You don’t want to be mithered with batteries and charging and limited video length. And you don’t want to look like a Teletubby with a camera stuck on the top of your helmet.
The VIOFO MT1 Motorcycle Dashcam has both front and rear cameras. It is hardwired onto your bike so it starts to record once the ignition is on and stops when the ignition is off. You can put a 256GB microSD card into it that will record around 18hours of footage on the front and rear cameras in 1080HD at 30FPS. You will never miss capturing that silky smooth set of curves again. The DVR (Digital Video Recorder) is water resistant and conforms to IP66 protection so it ideal for use on a motorbike.
In the box is the full system, two cameras, DVR, remote mic, 32GB MicroSD card with adaptor, GPS receiver, wiring loom for connection to battery and switched live, a load of sticky pads, hook and loop pads and zip ties. There is also a well written, simple instruction manual, but who’s ever going to read that, right? There is a downloadable APP for your smartphone that you’ll need to adjust the settings. More on that later.
I have used another twin camera video system for a few years now so was interested to see the differences between these two systems which, on the face of it should be very similar.
First job was to remove the old system that has done a great job over the last 3 years, producing content videos and also assisting in footage for rider training. Putting the two systems side by side you can see that the VIOFO is slightly bigger.
The quality of the connections appear better and because they are all colour coded it makes for a very easy installation so still no need to read the manual.
One of the downsides to hard wiring cameras onto your bike is that there is going to be some disassembly required. If you are not very confident in removing fairing and the fuel tank then something to consider would be the additional cost of getting someone to for it for you. Budget for around 2-3 hours work. There will also be some electrical connections to make. The kit includes a power loom that comes with connectors to attach directly to the battery and a third wire that will need to be attached to a switched live. Tap into anything that comes on with the ignition.
The permanent live wire is used to keep the camera system ready to record. There is an inbuilt G-sensor that detects if the bike has been moved or knocked and it will start recording until movement stops before resetting. The sensitivity can be adjusted (low, high and off) and there is also a motion sensor option that will start the camera recording if it detects movement in front of the cameras it will record for 60 seconds then go back to detecting motion again. The switched live starts the camera recording around 5 seconds after you turn the key. Once these wires have been attached to your bike, the rest of the fitment is very straightforward, the hardest decision being where to mount the cameras.
With all panels removed from the bike, you can start to identify the best place to mount the DVR and cameras. The length of the camera wires will dictate where the main DVR unit will be fitted. There is enough cable to run from the front/rear of the bike to the seat area but if you wanted to mount the DVR at the extreme front or rear of the bike you would struggle to make the connection. If you have a tortuous wire route through the bike frame then you might struggle with available wire length.
A few moments to plan your layout before you start the installation is time well spent.
Resting all the components on the bike and seeing where you can run the wires is a useful tip.
Once you are happy with where the DVR will mount you can start to run the wires. The colour coded plugs are narrow enough to squeeze through gaps and can be well hidden inside fairings and alongside the original loom. Make sure that there will be no pinch points when putting it all back together.
With the wires in their designated places and the plugs joined up it’s time to mount the cameras.
The kit comes with two types of mounting plate that are both essentially the same. One plastic and the other metal. You can choose to stick these mounts onto the bike with the supplied sticky pads or use a more extreme method such as self-tapping screws through the holes provided.
The design of the mounting plate gives limited options for camera location. There is no swivel facility once you have stuck the pad down. So if you are going for the sticky option be sure to get it right first time round. – a suggestion here is to get everything all wired in and working and then set the view of the camera up on the APP before securing the mounting plate to the bike. The mounting plates have quite a big footprint, this is to allow for enough sticky material to be in contact with the bike – a good idea but this limits fitment options. The last thing you want to be doing is fabricating mounting brackets and fitting them to the camera clamps. In this instance there wasn’t a good option for the front camera so, as a compromise, I re-engineered the foot and made it fit. Clearly, the smaller you make the area available the less secure the camera will be. Personally, I would have liked to have had a few more options available in the kit.
After a bit of fettling, the front camera was mounted and attention was turned to the rear. This was mounted to the underside of the luggage rack with a couple of Tek screws (not supplied). Both cameras have an indicator arrow to assist you with orientation when mounting. The cameras themselves are the same as each other and roughly the size of your thumb.
Next up was finding a place for the GPS sensor. This is used to record speed on your videos although it can be turned off. The GPS sensor will also track your geographical location so that your journey can be overlaid on to google maps via third party software such as Dashcam Viewer.
Finally, fitting locations also needed to be found for the remote control (which houses a couple of control buttons and the external mic). With all the elements connected up and wired in and all the panels put back on the bike it was time to see if it all worked. For that we need the APP.
The VIOFO app is available for android or apple from their respective app download locations.
The app controls the system settings of the camera. You can choose options such as time lapse speed, how long your loop recording is, sensitivity of the G-sensor, and if you want text superimposed onto the video – a great feature for content creators! There are also some very useful additional camera set up options available such as altering the exposure, this would be handy in dim or bright light conditions. You can set the speed unit and format the SD card all from within the app.
The app is very intuitive to set up and use. It was easy to connect to the inbuilt WiFi of the VIOFO MT1 system (password 12345678) and access the saved recordings. Fine tuning the camera placement can be done in real time while watching the image on your phone (not while riding your bike obviously!). There are 4 modes available Front, Rear, PIP (Picture in Picture) rear and PIP front.
You can use the app to take stills with the camera should you wish.
Getting familiar with the functions of the APP takes a few minutes of tapping on the screen. The interface is car orientated and I would have liked to seen a bike on the splash screen, but once in, it is possible to review video footage stored on the MicroSD card directly over the internal WiFi and delete videos if required.
Depending on the system settings you may see that some videos are locked, these have been recorded due to activation of the motion sensor or G-sensor and can only be deleted by taking the MicroSD card out and putting into a computer. This is so that they cannot be accidentally deleted.
Getting a file off the DVR and saving onto your phone is possible but takes around 8 minutes to download a 10 minute video clip over the internal WiFi, much better to remove the SD card and take that to a computer for editing.
The video footage quality is full HD 1080P with a 170º wide angle. This is great for recording where you’ve been and where you are going. However, even in Full HD picking up registration plates is difficult. (Screen shots of Video)
If your reason for having a Motorcycle Dash Cam is to record wrong doers then unless you are close to them you will struggle to get a clean shot. At 30FPS a vehicle can be out of shot too quickly to capture a good frame.
Overall, this system offers good value for money at just over £200 and once installed can offer peace of mind to riders that want proof of fault in accidents and incidents. They can be very useful for fleet managers who want to keep tabs on their machines and riders, blood bike groups or for riding instructors.
My main use for it is to review footage taken when training associates for their IAM Advanced Motorcycle qualifications. They can reflect back on how they have ridden and with having the two cameras means I can lead or follow without losing footage of them.
If you want to see the actual footage taken by this camera please head to
Notice that the GPS has not recorded a speed on the video but watch right to the end and it does start to do something. This could be due to the positioning of the GPS receiver so that will need to be investigated but it is in the same position as my previous one was.
There is a lot of wind noise from the remote mic and this could probably be fixed by altering the location to a quieter wind noise / louder engine spot but, as it has the control buttons on it, some consideration and some trial and error may be required to find the sweet spot.
Overall, it is an easy to install and user friendly system that quickly connects to the app and offers different modes of recording and playback. Being around £100 cheaper than my previous system it’s a good choice for those looking to save a few quid and still have the peace of mind that on-board video recording gives you.
[wpdiscuz-feedback id=”o7zqpzphjz” question=”Tell us what you think?” opened=”1″][/wpdiscuz-feedback]
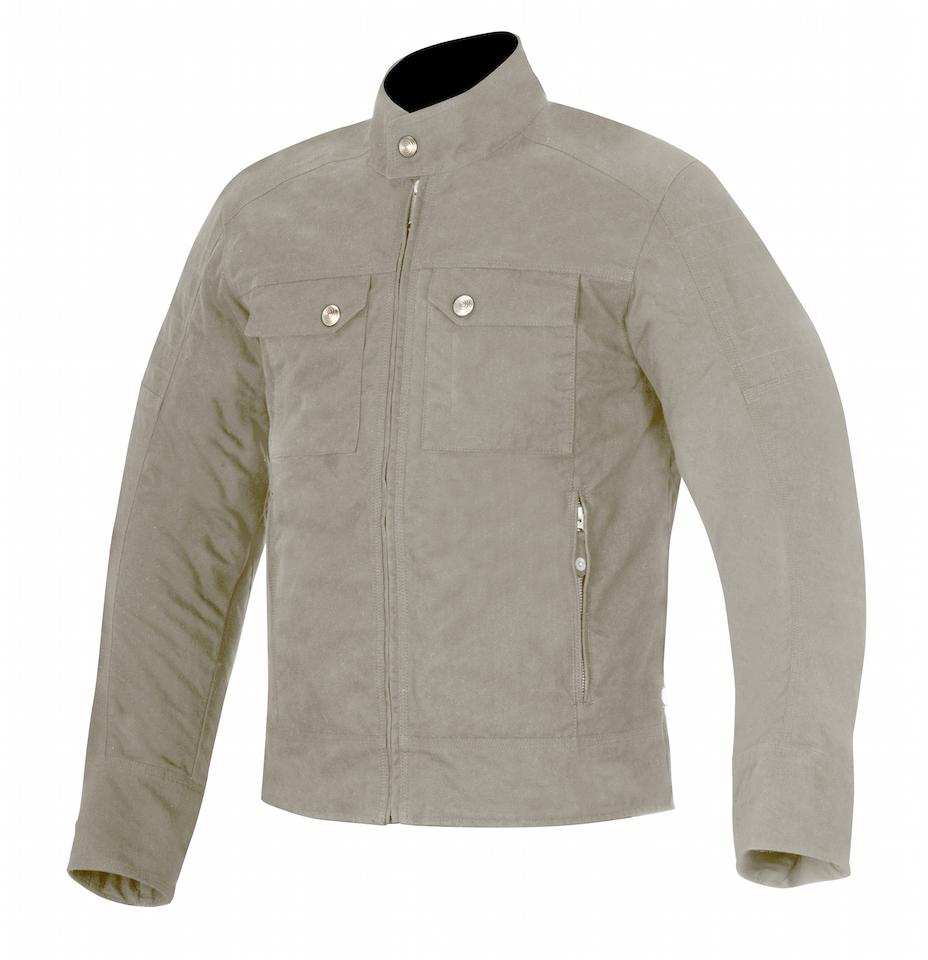
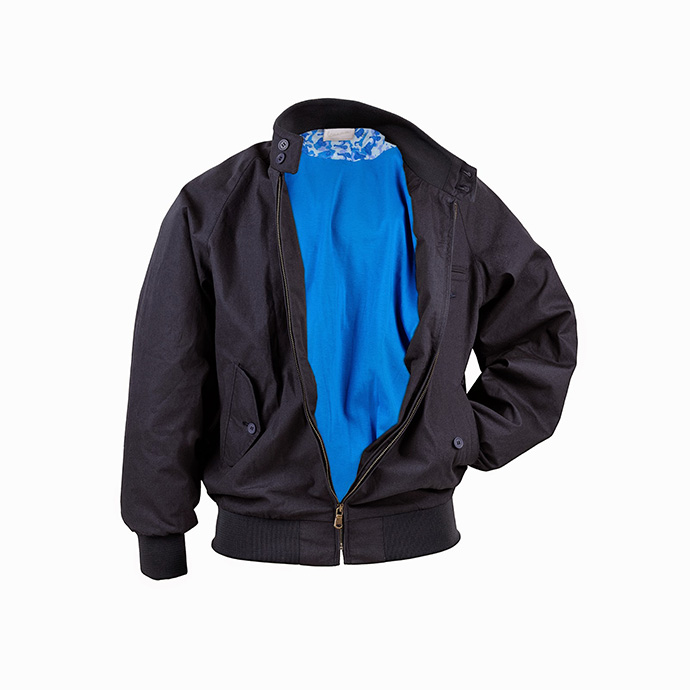
We get to try and wear RST Maverick Textile Jean (Jacket see here) with many thanks to RST Moto head to the official RST website rst-moto.com for more info.
Trousers form a crucial component of any apparel and are used to protect the lower body parts. The market is flooded with trousers of various specifications; however, you only want the best stuff when you are investing a considerable amount of money and also to protect your limbs.
This is where the Maverick textile jean steps in, the trousers are made out of the finest grade materials out there and utilize some of the most innovative technologies to provide added comfort to the rider in a variety of situations. Starting with the looks of the trousers, one can confidently say that they look cool and their colour schemes also add to their appeal. The quality feel and looks are complemented by several features which we will discuss here one by one.
As mentioned earlier, safety is the primary job of any motorcycle trouser, and thankfully, the RST Maverick Textile jean checks all such boxes. To begin with, the jean holds an overall CE certification to level A and a knee protection certification of CE Level 1. All of these certifications in simpler words mean that these trousers provide a high level of protection in case of impact, especially when sliding over a tarmac. Its hardwearing MexTex ballistic outer construction is not only flexible but also prevents heat energy from reaching the body parts when skidding over a rough surface.
In addition to the safety features, the Maverick textile jean offers great versatility too. Thanks to the inclusion of a dedicated pocket, the hip armor can be included and taken out whenever there is a need to. Both the SinAqua waterproof membrane and the thermal liners are detachable, hence providing you the freedom and flexibility to include or exclude them according to the weather conditions. The waterproof membrane allows sweat and vapor from the body to leave but at the same time provides an excellent barrier against external vapors.
The list of versatile features does not end here. A 360° zipper provided around the top of the trousers makes it compatible with any RST garment. Furthermore, the trousers are tailored to provide excellent ventilation in the summer season, for which separate vents have been provided on the upper thigh portion that can be opened and closed depending upon the outside conditions. This makes the RST Maverick textile jean an ideal choice for the summer season too. Lastly, the stretch panels/ pads located at the knee allow for easy adaptability to a proper riding posture without making the rider uncomfortable.
Verdict:
This is my first time wearing RST textiles they fit nicely and the build quality is excellent.
The RST Maverick textile jean stays true to its name and offers a wide array of features that make the experience of riding a motorbike more relaxing and enjoyable.
Whether it is safety or user-friendliness, the trouser excels in every category and successfully delivers on its promise of providing riders of every age with an exciting experience.
So, if you are looking for waterproof and warm textiles then look no further than the RST Maverick Textile Jacket and and jeans.
For more reviews check out our dedicated Reviews page
For more RST Apparel News check out our dedicated page RST News
We get to try and wear the RST Maverick Textile Jacket and Jean (jeans see here) with many thanks to RST Moto head to the official RST website rst-moto.com for more info.
Motorbike jackets form the core of any rider’s journey on a bike and riders are ready to go to great lengths to ensure that they are buying the right jacket that fits their needs most adequately. The availability of a large number of motorcycle jackets nowadays has caused a problem for buyers and they are now having a difficult time selecting the jacket that fits their needs perfectly. However, you don’t need to worry about that because here we are going to talk about a textile jacket that can fill the needs of nearly every rider out there.
We are talking about the Maverick textile jacket made by RST that offers exceptional versatility due to the integration of numerous features. Before starting its review, it is important to mention here that the jacket has been designed to go together with the Maverick textile jean, which is why a 360° zipper has been provided around the top of the jean and the bottom of the jacket. In addition to the compatibility, the Maverick textile jacket also shares many similarities with the Maverick textile jean. So, without further ado let’s dive into the specifications and details of this textile jacket.
The RST Maverick jacket utilizes the signature MaxTex ballistic outer construction that enables it to be flexible and rigid at the same time. This property allows it to bear a considerable amount of wear and tear that occurs during a crash while sliding on a tarmac. The ballistic outer construction has earned the jacket a CE certification to Level A, this certification is further complimented by CE certified Level 1 back protector, shoulder, and elbow armor. These body-specific armor parts safeguard critical body parts from the severe impact created as a result of the body hitting a roadblock or the road itself.
The jacket offers great versatility which allows you to wear it in different weather conditions. Both the waterproof membrane and the thermal liner are detachable and both of them can be attached to the jacket at the same time. This combination makes the Maverick textile jacket an all-weather motorbike jacket that in addition to safety, provides several other benefits too.
All of the above-mentioned features would be useless if the jacket would be uncomfortable to wear while riding. Therefore, RST has cleverly utilized even the smallest of spaces to provide pockets so you can store essentials such as mobile phones, wallets, and keys. Furthermore, the stretch panels are located conveniently at the elbows and the lower back to deliver enhanced maneuverability while changing positions on a bike. Hot summer conditions were also taken into consideration while designing the Maverick textile jacket, hence vents are provided with an open and close mechanism to route air throughout the jacket.
Verdict:
This is my first time wearing RST textiles they fit nicely and the build quality is excellent. My first impression is this product is quality, a great fit and is nice and warm etc
Overall, the RST Maverick textile jacket is a great motorbike jacket that provides exceptional versatility which enables a rider to use it in a variety of situations.
CE certifications mean that it can withstand a considerable amount of abrasion which will ultimately protect the rider.
All of the features combined make it at par with some of its much expensive rivals.
So, if you are looking for waterproof and warm textiles then look no further than the RST Maverick Textile Jacket and and jeans.
For more reviews check out our dedicated Reviews page
For more RST Apparel News check out our dedicated page RST News
We are looking to review the following items, if you have an item or bike you would like us to review and have it featured on Superbike News and Laramoto.com just email us Superbike News
This 1170cc opposed-twin boxer engined motorcycle is powerful, yet manageable. It handles well and sounds really cool!
We look at how it rides, the brakes, handling, suspension, wheels, engine, gears and styling. How many mpg? We find out the fuel economy too. What does it sound like? How about one with aftermarket pies!
Who is it for? Would you buy it? Your questions will be answered by watching this video.
Thanks again to Wollaston Motorrad BMW in Northampton UK. https://www.wbikes.com for lending us this bike. Check out their website for all the deals!
This is a SizzApp review about a bike tracker that I didn’t think I’d use, but since I fitted it, it’s become essential. As much as we’d love to ride our bikes 100% of the time, at some point we are going to leave it; either tucked up in a garage, or maybe in a free parking space on a busy street, or in the corner of a poorly lit car park. I used to regretfully look over my shoulder as I said goodbye to my precious motor. Now I can walk away knowing I’m still connected to my bike through the SizzApp monitoring device.
The immediate reassurance of fitting a tracker are the movement notifications, indicating that your bike has moved. In my case, my delightful partner was taking her out of the garage for a clean and the SizzApp device alerted my phone immediately via a ‘towing’ notification. It will also tell you less good news, if the monitor had been unplugged, the signal was jammed or if it has been in a crash. You can even set up a ‘Geofence’, where it will report if your bike has moved outside the perimeter you have set around your home, or where you parked it. If you’ve left your bike sit for a while, it’s easy to check the battery voltage too, all reported in the app.
The tracking GPS function is ideal for a group ride out. If you’ve all got the monitor fitted; being separated is easily fixed as you can see exactly each party is and navigate straight back to each other. You can record all your ride-outs for the last 2 years, share your favourite rides on social media and plan trips with others. You even get some bragging stats for the cafe stop, including top speed (km/h), braking & acceleration forces (m/s2)… best to save those max efforts for the track eh?
The less appealing bit is fitting it. It is definitely simple but if you’ve got a bike where the battery is firmly tucked under fairing instead of your seat, it’s a pain. The app interface is a bit sensitive and not quite as intuitive as you might be used to, however I’ve never had better instant customer service than the @Sizzapp Instagram team. Now I’ve fitted the Sizzapp monitor I don’t want to give it back!
Watch this space you will be able to get the Sizzapp at a very discounted price for Superbike News readers.
For more information on Sizz App visit sizzapp.com
Next up Lara will be reviewing a Ducati Panigale v2 for us courtesy of Chris and Martin from Ducati Manchester in the meantime you can check out LaraMoto’s Youtube channel.
If you would like to receive our headlines daily to your email inbox then sign up to our newsletter
[mc4wp_form id=”67857″]
We review the Triumph Speed Twin 1200cc modern classic Roadster, with the Bonneville engine.
This motorcycle is built for cornering; it has a short wheelbase and trail and a steep rake. What is it like to ride? We give you all the info!
We look at the handling, speed, comfort, ergonomics, acceleration, brakes, suspension wheels, design, engine, exhaust and more!
As with all our reviews, we put ourselves in the shoes of the type of person who would buy this motorbike. Is it right for YOU? Watch to find out. Will it be OK if your’e tall? If you’re short, can you ride it? Is it heavy? Is it too much?
We were filming in gale force winds AGAIN so we apologise for the sound quality, although we have filtered most of it out.
We also go over some of the stats like fuel economy, range and what it has, such as modes for Road, Rain and Sport.
We review a really nice black Honda Rebel motorcycle.
This bike can be ridden on an A2 licence in the UK and EU (of course other countries don’t have our stupid licensing laws).
We look at the engine, performance, acceleration and brakes, handling, suspension, size (will it be too big or small for you?), styling, wheels and tyres, equipment seats and more!
After watching this video you will be able to make an informed buying decision.
We assess this bike from the point of view of two generations, young and older (ish). What are its good points and bad points? Price and specs too!
Yamaha Niken GT – Are 3 wheels better than 2? Review by Laramoto.
The Yamaha Niken is a radically new way to travel. This review covers how that front end really feels, how easy the GT is to manoeuvre, whether the engine has enough grunt at GT weight and some pretty shots of the beach 😉
Why bother buying a dedicated sat nav like the TomTom Rider 550 when your smart phone will do? It’s exactly the question I asked myself before my 10 day tour around the Pyrenees. When we got stuck in the mountains and my mates smartphone had failed to find signal and cooked itself, I knew I’d made the right choice.
You’ll want the Rider 550 because its the latest dedicated motorcycle sat nav that TomTom has to offer and it includes worldwide mapping and pre-loaded motorcycle Points of Interests (POIs). Like any sat nav, you’ll need to consider how to mount it on your bike – look no further than the premium pack. It will remain on and charged and docks/undocks with a single click. You can fit the anti-theft system but I find it easier to take with me. The unit is totally weatherproof and has sufficient touch sensitivity, even through gloves.
The best bit about the TomTom 550 is the ‘Plan A Thrill’ feature. Select a destination and then adjust how wiggly or how hilly the route should be. The Rider 550 gets creative and takes you down anything but a motorway or dull A roads. I have found superb routes across the country that only a local would know exist, just add some common sense when you’re about to go green laning on your S1000RR.
It has regular speed camera updates and you can get your phone to talk to it through a dedicated TomTom app called MyDrive, but only via WIFI. The Rider550 syncs with a bluetooth headset too, but this is sometimes hampered by bluetooth connection issues. In summary – hassle free navigation wherever you are in the world. Reliable, weatherproof and with succinct instruction, you’ll find superb biking roads when you fit a TomTom 550.
Ducati SuperSport S Touring Review in the Pyrenees! review by Laramoto.
A review of my Ducati SuperSport S after 2000 miles round the Pyrenees – a seriously epic trip. I answer all the questions that every motorbike tourer needs to know – is it comfortable, how much can you carry, how does it handle and more! Video also includes some glorious shots of the Pyrenees.
Checkout Laramoto’s review of the TOMTOM Rider 550 as seen in the video
I capture some epic footage on my 360 camera, including hitting apexes and missing them… you’ll also get to meet the brilliant Jon Skelly, the owner, engineer and racer of his 2 Suzuki GSXR 600 SRADS who for some crazy reason lets me ride and race them..
We review, at long last, the Triumph Rocket 3 motorbike.
This is the worlds most torquey production motorcycle! Is it too hot to handle or is it for you? We find out.
We look at the handling, brakes, acceleration, ride modes and find out what it is like to ride. Is it stable? Is it good in the corners? Is it big or small? How does it fit different rider sizes and heights? Is it too heavy?
Does it handle like a sports bike or a cruiser. Rake and Trail – we give you the correct info. We tell you the mpg, fuel economy, and range on a full tank.
This beautiful, modern design may not be for everyone, but if you watch our videos, you will at least be able to make an informed decision.
We review the long awaited BMW R18 cruiser motorbike.
As a genuine cruiser rider, the Ol’ Man knows what he’s talking about! We love cruisers and compare this BMW to the Harleys. Is it as good? Is it better? Should you consider this bike when you are making your short list?
We give it a thorough testride before giving you the review, as always.
We look at the speed, handling, acceleration, brakes, suspension, styling engine and everything you need to know!
This motorcycle is hugely torquey and that is what you need from a cruiser. It has a long wheelbase – longer than the Harley-Davidson’s and that is great for us bigger people. We talk about the Street Bob, Breakout, Heritage-Classic, Fat Boy and take you through the thought process.
What about the mid-controls – does it need forward controls? We find out. Please contact our chosen BMW Motorrad dealership Wollaston BMW Northampton UK at https://www.wbikes.com they are brilliant!